Introducing Lichess Puzzle Timer: A browser extension to help you do chess puzzles slower
Introduction
A friend asked me if I knew of any chess puzzle apps that had a timer to prevent him from trying to move so quickly. I didn’t, but introducing cristoper/lichess-puzzle-timer, my first browser extension!
Unlike other timers, this one prevents you from making a move until the timer expires to try to help you force yourself into actually calculating all variations. (There is also a traditional "Blitz" mode if you prefer. If you like Puzzle Storm but wish you could lose real puzzle rating points, try Blitz mode with 10 seconds and "Jump to next puzzle immediately" option enabled.)
Once installed it should add the timer above the move list on puzzle pages. You can disable/enable it with the toggle to the left of the timer, and change settings by clicking on the gear icon to the right of the timer.
Where to get it
Source code on Github: https://github.com/cristoper/lichess-puzzle-timer
The lctimer.js file also works as a Tampermonkey script, so you can install it on any browser supported by Tampermonkey.
I’ve also built an (unsigned) Safari extension. Download link and instructions are in the Github readme.
How to use it
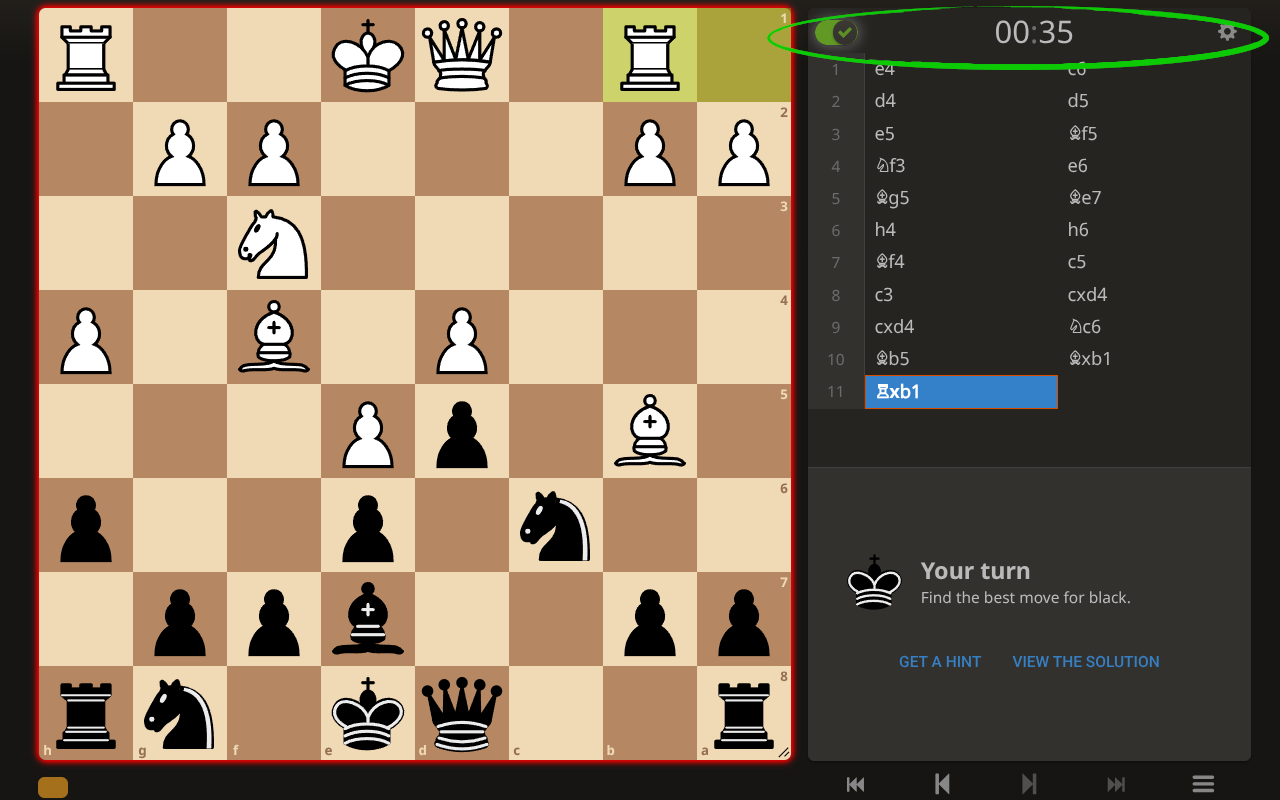
Once installed, navigate to a lichess puzzle trainer page (like the daily puzzle) and you should see the timer sitting above the move list (circled in the screenshot below):
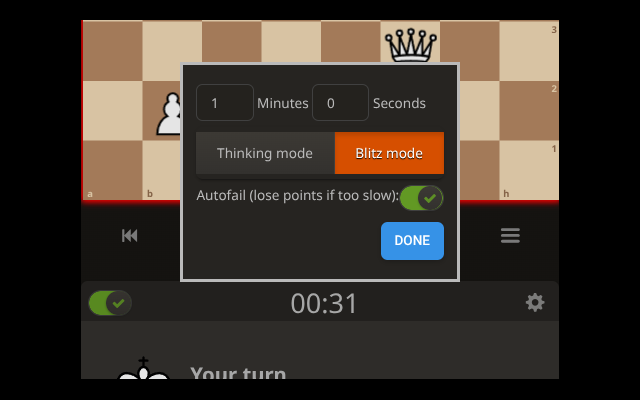
Click the gear icon to the right of the timer to open the settings dialog:
Thinking mode
This is the default mode. In this mode the board will have a red outline and you will not be able to make a move until the timer expires. Use this time to force yourself to calculate your candidate variations and consider all responses. Once the timer reaches zero, the board outline will turn green and you may make your move.
While the board outline is red you can right click to draw arrows. To erase arrows, draw another one on top of the arrow you wish to erase.
Blitz mode
In this mode the board outline starts out green and you try to make your move before the timer runs out. For extra stakes, enable “autofail” mode so that if you have not solved the puzzle in time it is automatically failed.
How it works
The extension consists of a single javascript file (lctimer.js) and a single css file (lctimer.css)
It also contains a manifest.json file which tells the browser which URLs to load the extension on (the extension you install consists of these files together in a .zip archive):
"content_scripts": [
    {
      "matches": ["*://*.lichess.org/training*"],
      "js": ["lctimer.js"],
      "css": ["lctimer.css"]
    }
  ]
The matches line instructs the browser to only load the extension on URLs matching the pattern (lichess puzzle pages).
The CSS tries to fit the timer into the lichess.org site. For the most part I try to use existing html `class`es so that controls adopt the lichess look automatically.
Starting up
By default, the browser will insert and run the javascript after the page is finished loading (this can be changed by specifying a run_at key in the manifest.json file).
While testing, and in the first version of the extension I released, I initialized the extension code by listening for the window load event that is fired once the html page has been loaded, like I would do if developing javascript loaded by the page itself. But because the extension is inserted after the page is loaded by default, waiting for the load event is not reliable. The first version of the extension worked in Chrome and sometimes in Firefox; but sometimes it would not load at all in Firefox because the window load event was fired before the extension code was loaded.
The current version checks whether the document is already ready when the extension loads (and if not then it waits on load as usual). That way it will always initialize regardless of when the browser inserts the extension:
if (document.readyState === 'complete') {
    startExt();
} else {
    window.addEventListener("load", startExt);
}
The first thing the script does when loaded is looks for the <div class="puzzle__tools"> element and adds an html div to the top of that and then uses that as a container for the timer:
const puzzle_tools = document.querySelector(".puzzle__tools");
const timer = document.createElement("div")
timer.className = "lctimer-container";
puzzle_tools.prepend(timer);

const settings = new LCSettings();
const app = new LCPuzzleTimer(timer, settings);

app.newPuzzle();
The entire javascript extension consists pretty much of the LCSettings and LCPuzzleTimer classes.
I don’t do much frontend development, but when I do, these classes are typical of the approach I take to implementing simple components:
-
The
constructor()accepts an HTMLElement to use as a container, adds its own html to it, and keeps references to any DOM nodes it needs to update in instance variables. Also sets up any event listeners. -
Has a
render()method that updates its DOM nodes based on state of instance variables -
Has setters to set state which in turn call
render()so the component stays in sync with its data
This is fast, easy to get started, uses no build step, no framework, no observables, no virtual DOM diffing, and is mostly easy to reason about. I think for small (to medium) web apps it represents a good compromise between DOM-manipulating spaghetti code and a reactive framework. Though probably using web components, which has good browser support, is an improved version of this es6-class-as-component technique.
Timer
To do the actual timing, which is important for a timer, the LCPuzzleTimer class manages a setInterval timer. Here is its start() method:
start() {
    if (!this.settings.enabled) {
        return;
    }
    this.running = true;
    this.startTime = Date.now();
    this.lastTick = this.startTime;
    this.timer = setInterval(() => {
        this.tick();
    }, 100);
}
So that when the timer is running, the tick() method gets called every 100ms:
tick() {
    if (this.running) {
        const now = Date.now();
        const diff = now - this.lastTick;
        this.time -= diff;
        this.lastTick = now;
        if (this.time <= 0) {
            this.expired();
        }
    }
    this.render();
}
The tick() method calculates how much time has actually elapsed since the last tick() rather than blindly trusting the browser to call every 100ms. That way any jitter in the javascript event loop doesn’t add error to our timer. It then calls expire() if the timer has expired; otherwise it calls render() which actually updates the timer.
In the render() method, the time displayed to the user is decremented once per second until it is below 10 seconds, then it is updated every 100ms (this mimics the lichess game timer which starts showing fractions of a second once the clock is low enough).
For better accuracy we could set the interval to something faster than 100, even 0 (which would run tick() as quickly as the JavaScript event loop runs, though most browsers will throttle it to 4ms after a few ticks). But there’s no sense wasting CPU time running our code more often than we need to.
Note that for better precision we could have used requestAnimationFrame() which calls a function before every screen refresh (so you can be sure your animations don’t tear/flicker). But that is overkill for our 100ms timer needs.
Preventing board clicks
To actually prevent the user from making a move while the thinking timer is running, we add a mousedown event listener to the <cg-board> element and run stopPropagation so that the lichess components never see the click. Here is the full method called by the mousedown callback:
clickedBoard(event) {
    // user tried to click board while locked, flash the background
    // and block event
    const leftButton = event.button === 0;
    if (this.running && this.settings.enabled && this.settings.slowMode && leftButton) {
        this.flashBG = true;
        setTimeout(() => {
            this.flashBG = false;
        }, 100);
        event.stopPropagation(); // prevent making moves on the board
    }
}
Notice that it only prevents leftButton clicks so that the user can still draw arrows with the right mouse button while thinking. The callback also has logic to flash the border for 100ms if the user tries to click before the timer has expired.
Detecting when puzzles start and end
One challenge for this extension is detecting when the user completes, fails, and starts a new puzzle so that we can stop/reset the timer.
We solve it by using the MutationObserver() interface that all browsers support.
We pass MutationObserver() a callback that is called every time the DOM changes. We then traverse the list of removed/added nodes and check if any of them correspond to the puzzle feedback messages lichess displays when a puzzle is completed. This is probably one of the more fragile dependencies we have on the lichess page… if they ever change how messages are displayed it will break the extension and we’ll have to update it accordingly.
This is the full callback called by MutationObserver():
const cgCallback = (mutationsList, observer) => {
    for (let mutation of mutationsList) {
        if (mutation.type === 'childList') {
            // if div.puzzle__feedback.after is removed, assume new puzzle
            for (let node of mutation.removedNodes) {
                if (node.classList && node.classList.contains('puzzle__feedback')
                    && node.classList.contains('after'))
                {
                    this.newPuzzle();
                    return;
                }
            }
            // check for success and fail feedback messages
            for (let node of mutation.addedNodes) {
                if (node.classList && node.classList.contains('puzzle__feedback')
                    && node.classList.contains('fail'))
                {
                    this.puzzleFailed();
                    return;
                }
                if (node.classList && node.classList.contains('puzzle__feedback') && node.classList.contains('after'))
                {
                    this.puzzleSucceeded();
                    return;
                }
            }
        }
    }
};
Note that puzzleFailed() and puzzleSucceeded() are only relevant to the Blitz mode where the user can make moves while the timer is running. Further, puzzleFailed() doesn’t actually do anything: we allow the user to keep trying to solve the puzzle while the timer is running. But we detect it in case we want to react to that event some how in a future version.
Autofail
The Blitz mode has a feature called "Autofail" whereupon the extension will fail the puzzle as soon as the timer runs out. To implement this, we simply click the "view the solution" button on the user’s behalf when the timer expires:
function clickViewSolution() {
    document.querySelector(".view_solution").querySelectorAll("a")[1].click();
}
Settings
The settings dialog is implemented using the native <dialog> element supported by all modern browsers.
When the dialog is closed, the settings are used to update the state of the LCPuzzleTimer instance. They are also persisted to localStorage which is an alternative to cookies for storing data so that it is not sent to the server on every request.
When the extension is loaded, it initializes its settings from any found in localStorage, that way the user’s last settings always take effect even between sessions.
One difficulty with implementing setting persistence is that I wanted the extension to also be installable as a Tampermonkey userscript, but userscripts do not have direct access to the localStorage API and instead must use the GM_setValue() and GM_getValue() functions.
In order to use either storage interface, I use a little abstraction class:
class Storage {
    static setItem(key, value) {
        if (typeof chrome !== 'undefined' && chrome.storage) {
            const val = {};
            val[key] = value;
            return chrome.storage.local.set(val);
        } else {
            return GM_setValue(key, value);
        }
    }

    static getItem(key) {
        if (typeof chrome !== 'undefined' && chrome.storage) {
            return chrome.storage.local.get(key);
        } else {
            let result = {};
            const v = GM_getValue(key);
            result[key] = v;
            return Promise.resolve(result);
        }
    }
}
If chrome.storage.local is available (which is Chrome’s asynchronous version of localStorage and also supported by Firefox) we use that; otherwise we assume the script is installed in Tampermonkey and use the GM_getValue/GM_setValue functions (and wrap the return value of GM_getValue in a Promise so that the calling code doesn’t have to care whether it is using chrome.storage.local.get() or GM_getValue().
Conclusion
Those are the highligts. Of course read lctimer.js to see how everything fits together.
I wrote the code by hand, and I’m not very fast at coding, because hobby, but I am a little curious how quickly and well an LLM could knock a simple extension like this out :shrug: